“Money can’t buy happiness, but it can buy a camper, which is kind of the same thing.”
— Somebody that is not me.
Yellowstone is a behemoth National forest. There is a lot to check out in the park as well as luckily lodging in Yellowstone abounds. Yellowstone has more National forest hotels within park boundaries than any other park, as well as camping areas are plentiful as well. Behind Yosemite National Park, Yellowstone is regularly the second-most popular national park for outdoor camping. Currently you are most likely assuming, “plan in advance …” And also yes, while planning in advance is essential in aiding you optimize a Yellowstone National forest holiday, if you are intending an eleventh hour get-a-way you may still have the ability to grab a first-come, first-serve outdoor camping area or hotel room. Last month, I did just that. Utilizing Yellowstone’s online tools, which we’ll discuss in this article, I had the ability to obtain a last minute camping site with my Sprinter Van with no ahead preparation. In this article, we’ve created a guide to aid you find campsites in Yellowstone National forest, in addition to other lodging options. If you can’t obtain an area in the park, you’ll discover some practical ideas for lodging outside the park also.
ADVERTISEMENT FOR PUMPKIN SEED SNACK
Crucial Notes to Consider Concerning Yellowstone Accommodations
Old Faithful Snow Lodge & Cabins are the only interior lodging options open year-round.
Roosevelt Lodge & Cabins are the earliest to close at the end of the summertime season. They are only open very early June to very early September.
None of the lodging choices in Yellowstone have tvs. We only say this to remind you that you are staying in a lodge in a National Park. Expect it to be a little rustic!
And don’t get as well caught regarding trying to determine which lodge/cabins are the very best. They are all run by the exact same park concessionaire, Xanterra. The facilities from one lodge to another just differ slightly. Again, exact same advice as selecting campgrounds– concentrate on the area of the park you wish to stay for the night. It is worth checking out a few of the lodges during your Yellowstone journey if just for a pit-stop, as a few of them are National Historic Landmarks. Below are our favorites for scoping out:
Lake Yellowstone Hotel has a lovely sun area that ignores Yellowstone Lake with many comfy sofas as well as chairs readily available to absorb the view. Outside you’ll typically locate classic Yellowstone touring cars. The resort is among the nicest in the park as well as features a large bar, which makes for a great place to get an alcoholic drink as well as take a little break from exploring.
Do not miss the renowned map space at the Mammoth Hot Springs Resort. It features a map of the USA built from numerous types of timber.
Old Faithful Inn is a should go to; it is just one of one of the most historical and famous resorts in the whole National Park system. You can not miss its grand existence behind Old Faithful. The Inn is the biggest log hotel in the whole globe. They provide FREE trips daily when the hotel is open, call or inspect online for excursion times. Expert Tip: There is a great little coffee stand tucked away upstairs as well as there is also a bake shop in the hotel if you are desire a sweet reward.
ADVERTISEMENT
This is the first post on my new blog. I’m just getting this new blog going, so stay tuned for more. Subscribe below to get notified when I post new updates.
Let us work together to bring about a positive transformation in the way American society approaches our teenagers. Amanda’s blog post is a great source of inspiration, as it emphasizes the changes that are necessary to create a better future for all Americans!
There is nothing worse than getting miles away from civilization and encountering an emergency you are not prepared for. Whether you’re lost with no food, caught in an unanticipated rain, or in pain from poor footwear, treking without the best devices is never ever a fun experience.
Your gear will vary depending on what kind of hiking adventure you are preparing, however whether you’re backpacking the Appalachian Trail or preparing a day trek with your household, there are some pieces of hiking gear you ought to always remember.
First, you need a rugged treking backpack to easily hold the rest of your equipment. A small day pack may be all you need if the majority of your hikes are short and you rarely plan to remain overnight. If you are preparing longer hiking journeys, try to find a knapsack that fits comfortably with plenty of compartments and sufficient room for all your food, protein snacks and equipment.
Proper shoes is another important piece of treking equipment, no matter where and the length of time you are hiking. Select hiking boots or shoes that are designed for the kind of surface you will most often be hiking and make sure they are a comfy fit. Wear high quality treking socks also, developed for the particular climate you are in and cushioned for extra support. For a more accurate fit, purchase your treking socks first and use them to look for your hiking boots.
Always have a map of the area you are hiking, as well as a compass. The Coleman digital compass is great for backcountry hiking. Trail maps are typically readily available at the ranger station for the majority of state and national hiking path systems.
Food and water is a must, no matter for how long you are hiking. Long walkings need at least one gallon of water per person each day, while 32 ounces of water per person is usually appropriate on much shorter walkings. Bring along a lot of calorie rich snacks, like jerky and trail mix, for all your walkings and load an extra day’s supply of food for overnight hikes. It’s a good idea to bring adequate food for both lunch and dinner on your day hikes, just in case things take longer than planned.
You will likewise desire a first aid package with you on all your hiking trips. Unless you are hiking in extreme conditions, you will just desire the essentials for insect bites, small scrapes, blisters, thorns, and other typical path conditions. Sunscreen, lip balm, and insect repellant ought to likewise be included in your hiking first aid bag.
Never begin on a hiking journey without rain equipment and extra clothing, specifically in areas with really unpredictable weather condition. A lightweight rain coat with a hood is ideal if you get caught in the rain. An emergency shelter might be a requirement for extreme weather condition hiking and an emergency situation blanket is a should if you’re treking in the winter season.
Another necessary piece of hiking devices that you shouldn’t forget is a little flashlight. Flashlights are important for long walkings when you require to find your method around camp, but they can show to be convenient on day walkings too if you are still treking at sundown.
Make certain everybody you are treking with has a whistle for emergency situations. Other hiking equipment you need to bring on every journey is some sort of fire starter, along with wind and rain resistant matches, and a multi-purpose knife.
These are one of the most standard basics for any hiking journey. Longer trips will require extra gear, as will extreme weather condition walkings. You may desire additional gear, depending on your hike and your interests, like binoculars, a hiking pole, or a trail guide.
There are things to do while visiting Seattle, Washington that are inexpensive or either free. Many of the free things to do around Seattle are outdoor activities. Since of the extraordinary views and magnificent surroundings in and around the area, it makes perfect sense that several of these would be checking out the many state parks in the area.
Not all state parks are free to visit but listed below, you will find information on some. If you are a huge fan of nature and the outdoors, this must get your blood pumping. Keep in mind to bring along all the fun devices that make the outdoors fun.
Firstly there is Deception Pass State Park. This park has seawater, freshwater, outdoor camping, trekking, boating, magnificent views, and a couple of locations with play area devices for the children. There are many activities appropriate and available for the island: hiking, horseback riding, boating, fishing, swimming, white water kayaking, diving, clamming, crabbing, bird watching, mountain cycling, and simply seeing the terrific scenery that nature provided.
Next, there is Fort Worden State Park. Fort Warden is a state park in 1955 and stays a popular park and convention. Camping centers are opened on the park year-round. There is a crazy amount to do to keep visitors hectic, pleased, and captivated.
Fort Flagler State Park, like Fort Worden, originally protected the entrance into the Puget Sound. Also, like Fort Worden, Fort Flagler became a fantastic state park in 1955. Fort Flagler still has a couple of the original military facilities that tell the proud history. The seawater around the three sides is terrific. While there are many resemblances between Fort Worden and Fort Flagler, the latter is open for campers for part of the year. Day visitors are permitted year-round, nevertheless. It is the spectacular view of the Sound and the surrounding mountains. However, that makes this park so incredible. I hope you have the possibility to go.
Finally, there is Lime Kiln Point State Park. This park is a 36-acre piece of land that is just for day use. The park sits on the western side of San Juan Island and is an excellent location to watch Orca whales. In addition to enjoying the whales, you can go hiking, trip the lighthouse, and enjoy seeing numerous other wildlife here as well. Diving is possible here but highly unsafe as the currents are not forgiving. The lighthouse still serves as a navigational help for ships in the Haro Strait. Since of the lighthouse and the possibility of seeing whales while visiting, while this specific park offers fewer facilities, it remains my favorite merely. The months of June and July are the very best for whale watching; however, any time throughout May throughout September, whale finding remains possible.
Camping offers a great escape from the weekday regimen. You can boost your outdoor camping experience with innovative outdoor camping dish. An outdoor camping dish can be as simple or as made complex as you want as there’s no reason to fear camping cooking. Food is so important when it comes to camping.
Start your day of rest with a hearty breakfast that’s easy to make. A breakfast that’s rewarding and simple to make is pancakes. You can speed things up while outdoor camping by using a pancake mix, nevertheless, if you like to make your own pancakes from scratch then pre-measure your dry ingredients, for example flour, baking powder, sugar and salt, and seal the ingredients into a zip lock bag. At your campsite you can easily add your damp ingredients and have a hearty pancake breakfast on the table in no time. A simple camping recipe for breakfast will permit you to enjoy a rewarding meal that will fuel you for your day outdoors while being simple and fast to prepare so that you don’t miss out on fun time.
Camping recipes are great way to have delicious and healthy meals while camping. Many outdoor camping and outdoors sites have camping dish ideas and likewise have areas where you can share your preferred outdoor camping recipe with other campers.
Household Camping
If you’re camping with your friends or family, make certain that you get everyone to take part in the preparation of meals. Camping dishes do not have to be limited to meat-filled classics, and there are numerous vegetarian camping recipes for kids and the entire family to take pleasure in and make. Fun camp cooking recipes are an especially fantastic activity for household camp outs. On a household outdoor camping journey, fun camp cooking dishes can be tried at the end of a day while you are delighting in the campfire. Camping dessert dishes are likewise enjoyable and simple for kids to make, and the entire family enjoys eating them. Have a preferred family camping dish that the kids love to cook. Blend your family’s preferred tastes into outdoor camping meals they will relish.
Don’t be afraid to bring a store bought dessert like cheesecake
Don’t be afraid to bring a store bought dessert like cheesecake. Be sure to store it in a cooler with lots of ice and leave it on the top off all the food in the cooler then eat it your first day of camping. Now if you have a mini fridge… Well you know what to do. I was surfing around Twitter and I found this great story that involves a small business and cheesecake. The story is in the video below!
Dutch Oven Camping Recipes
Cooking on outdoor camping trips can be the most pleasurable part of the experience, especially if you are not too crazy about spending the entire day hiking or playing cards.
Dutch oven campfire cooking is one of the best ways to make meals on camping journeys. Dutch oven camping recipes are terrific for breakfast– not just dinner– because all active ingredients can be cooked in the Dutch oven. Easy Dutch oven camping dishes for delicious meals around the campfire are offered at many websites.
Campfire Cooking
Everybody seems to work up a big hunger while camping, so you’ll want to be able to quickly whip up some delicious and quick camping dinner dishes to satisfy everyone’s appetite. Any grill recipe will normally work well over the campfire and the kids will enjoy cooking their own hot dogs over the campfire.
Everyone can partake in campfire favorites such as smores, or attempt a brand-new campfire dessert dish that is both easy and enjoyable to prepare.
Do you have a favorite outdoor camping dish? Share your preferred outdoor camping dish with your fellow campers. Camping sites can quickly offer you an option of easy camping dishes for breakfast lunch and supper to add and browse to your camp cooking menu or simply provide you concepts for your own.
You can improve your camping experience with innovative outdoor camping recipe. An outdoor camping dish can be as simple or as made complex as you want as there’s no reason to fear outdoor camping cooking.
Camping dishes don’t have to be limited to meat-filled classics, and there are numerous vegetarian camping recipes for kids and the whole household to enjoy and make. On a household camping trip, fun camp cooking dishes can be attempted at the end of a day while you are taking pleasure in the campfire. Camping sites can rapidly provide you a choice of simple camping recipes for breakfast lunch and supper to search and add to your camp cooking menu or just give you concepts for your own.
Did you assume all camping fanatics sat in your home and also regreted their fate during the rainy period? Absolutely nothing can be better than the truth! Veteran, hard-core campers do not let a little or also a whole lot of rain dampen their adventurous spirit. Similar To Gene Kelly that chose up his umbrella and went ‘Singing as well as Dancing in the Rainfall’, real campers get their outdoors tents as well as gladly go ‘Outdoor camping in the Rain’. And also if they are fortunate, the rainfall may just slow down long enough to allow them delight in some rowdy vocal singing and also dance around the campfire during the night.
While outdoor camping in the rainfall is absolutely difficult, with needing to withstand damp socks as well as slushy pools; it can be enjoyable if you bring along the ideal perspective. Think about every puddle you enter as an enjoyable tale to regale others with at future campfires. Saturating wet, ‘putting-up-the-tent-in-pouring-rain’ tales sure beat ‘putting-up-the-tent-under-the-moonlight’ tales any kind of day.
Selecting the best camping tent as well as packing the ideal gear can help make your stormy outdoor camping trip a bit drier, a minimum of while you sleep during the night.
Picking the Right Tent
Selecting an excellent top quality, rain-proof outdoor tents is essential. You may have the ability to withstand anything a stormy outdoor camping journey regurgitates at you while you are awake, yet there’s absolutely nothing faintly entertaining or interesting concerning a tent that sprouts a leak when you are tired and also rapid asleep. Review the tag meticulously as well as ensure the layer of the camping tent is waterproof; not waterproof.
Camping tents with ‘bathtub floors’ are specifically developed for outdoor camping in the rainfall. The entryway way forms a lip and also is not as level as the remainder of the flooring. These camping tents likewise have a complete fly sheet, which has an enough overhang so as to prevent the mud from getting splashed up.
When camping in the rainfalls, opportunities you are will certainly be investing a great deal of time inside. Buying a large-sized outdoor tents will certainly assist you as well as your camping buddies remain sane much longer.
Loading the Right Equipment
Other handy needs are the exact same as for any kind of camping journey in completely dry weather and would consist of a first-aid set, lantern and also most crucial of all, a lighter. Soggy suits do not a bonfire make.
A pair of rubber slip-ons would certainly be available in truly useful if you need to make brief trips to examine something outside the outdoor tents. They are very easy to slip-on as well as slip-off at the front door.
An umbrella might appear like a weird choice for a camping journey, it is indispensable for keeping things dry when moving them from the cars and truck to the outdoor tents.
Make sure the tarpaulin is smaller sized than the outdoor tents’s flooring and also is totally under it. A larger tarp will accumulate the rain water that runs off your tent and also create it to gather in between the tarp and also the camping tent flooring.
A pack of cards as well as a couple of parlor game are all you need to settle your outdoor camping journey in wet weather.
A Lot like Genetics Kelly that selected up his umbrella and also went ‘Singing and Dancing in the Rainfall’, real campers select up their camping tents and gladly go ‘Camping in the Rainfall’. You might be able to withstand anything a rainy outdoor camping journey tosses up at you while you are awake, but there’s absolutely nothing faintly amusing or interesting concerning a camping tent that grows a leak when you are exhausted and fast asleep. Camping tents with ‘bathtub floors’ are specifically created for outdoor camping in the rainfall. Make sure the tarpaulin is smaller than the outdoor tents’s floor and also is completely under it. A larger tarp will gather the rain water that runs off your outdoor tents and trigger it to collect between the outdoor tents and also the tarp flooring.
The reason why char cloth is so important to be made is because it only takes a small spark to set it off and there’s different ways. You can do it. That’s in our fire starting article. This one is basically char cloth, only char cloth or char paper.
Some people call it it’s just made from linen or a hundred percent cotton, and it doesn’t matter what size or shape you actually make it in as long as you just cut it, though, about the size you want, this is actually made out of an old pair Of Long John underwear shirt – and I can make hundreds and hundreds with that one shirt, but you can also use socks, pants t-shirts, anything that’s made out of a hundred percent cotton and that’s the preferred and what you’re doing is you’re charring this black and so in This next little clip I’m going to show you how to do it under controlled circumstances, with an aluminum, lid and pan that you can do at home and once that’s done, then I’m actually going to show you how to do it out of a cast iron.
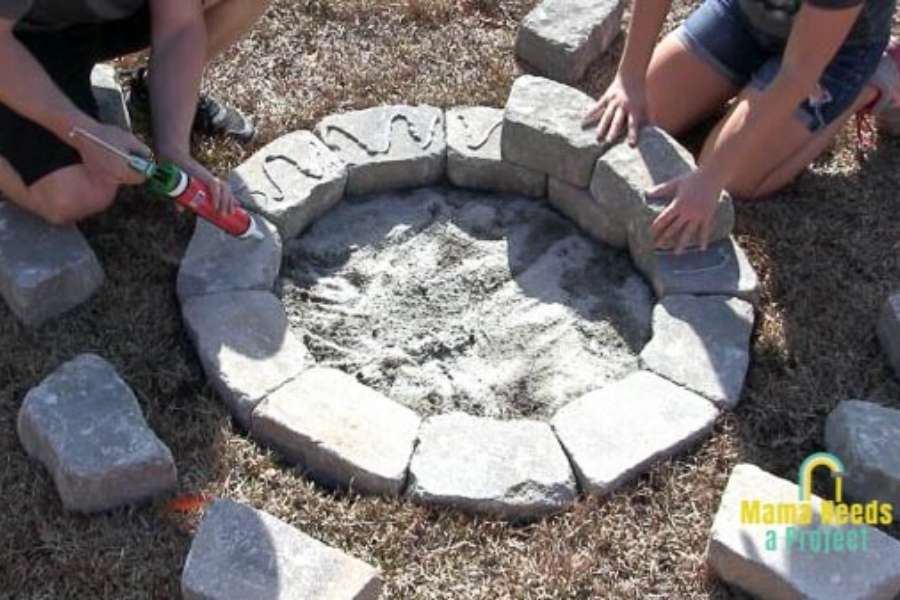
The important thing is is that your soil or your sand is dry. So the thing I’m going to do is just put sweats, and in here I’m going to stick it over the fire until that sand is dry once that sand is dry I’ll. Go to the next step. So, while we’re waiting for this take a look at this clip now I’m going to take and make some char cloth. So the first thing my little fire pit. This is called my capstone, and this way the smoke takes and rolls along hits the capstone and comes up, and it doesn’t black in my pants what I’ve done.
Percent cotton. I never throw away any of my shirts or anything. I just cut them into little strips. This is a aluminum 10. As the lid pushed down tight, it has the little hole on top, and so I’m going to build a fire and I’m going to place this on it. And what it’s going to do is heat up start burning that cloth and there’ll be smoke pouring out of here and that smoke you should be able to light on fire almost like a candle once that stops, then my char cloth is made after about an hour And a half, maybe even two hours, it’s time to check that char cloth there.
It is made from old, long underwear, 100-percent cotton, you use a t-shirt or anything else. So now I’m going to let this cool once these pools we’re ready to make fire on this uh 100-percent cotton cloth shirt, anything in the wild. Of course you would rip it. If you have a knife, you could just use the knife, I’m using a pair of scissors and you just cut it into chunks, cut it into strips first and just keep little squares and the biggest thing is to have your soil or sand, and I prefer sand To be as dry as possible, then what you’re going to do is you’re going to take your cloth.
This is approximately 50 pieces, so that’s 50 fires that I can make and you’re just going to line the bottom try to get it about as even as possible. Once it’s fairly even try to get them as flat, you cover it back up with your soil or sand. This kind of blocks the oxygen so that you’re, not just catching your cloth on fire place it back over the fire and in a cast iron. It doesn’t matter if it’s a Dutch oven or just a fry pan.
It’s only going to take about 20-25 minutes to actually make this. It’s actually extremely fast. That’s one of the reasons why the Pioneers back in the 1800’s, if they were attacked by Indians or if there is a situation, they would always carry their cast iron, they would leave everything else if possible. The reason for it is because, of course, you can cook, you can boil water, but it’s easy to make char cloth and it’s easy to start so we’re going to wait about 25-30 minutes and then we’ll tip it over and get our paws out of it.
It’s been approximately 30 minutes and it’s extremely dry and it should be ready. That’s what we’re looking for this char cloth extremely easy to make. Little spark will set it off now, you’re, probably saying okay, I bet. If I’m in the wilderness, I don’t have any pots or pans or anything well, you can actually use a coke. Can beer can anything like that any any type of container, but yet say you go you’d, say you’re out there like the Pioneers okay, what you’re going to do is you’re going to take and try to get as much dry sand or soil as possible and the Drier the better spread it out, keep the Sun drive.
It then you’re going to build as many kohls as possible. So I’m going to let this burn down and try to get as many coals in the bottom. As I can and i’ll show you, the next step will be right back, as you can see, there’s a lot of coals in here now and that’s the main factors that have a lot of coals. If there’s still a little bit of word burning or something that’s. Okay, now, because of the amount of coals, take anything a stick but kind of flatten them down, then you want to take dry, soil or sand and just sprinkle, because the one thing that’s doing is acting as a slight barrier, because you don’t want it burning too Fast and take your cloth just like you normally would sprinkle it in there.
This is almost how you would make charcoal even then you’re going to want more dry sand over the top and you’re going to let it sit there and just let it smolder and stuff. It’s okay, if it starts to catch on fire, put a little bit more sand on it, but all you’re doing is just lightly smoldering it so that the fabric is not being burnt too fast. You want it blackened and ready for yourself, but you don’t want it to be just instant.
This takes a little bit longer. Sometimes this could take an hour and a half to two hours before it’s ready, and so I’m going to leave this for probably about two hours and come back and check on it right back. It’s been a couple hours now, it’s still pretty warm. This is what we’re looking for is the char cloth once you get it out of the hole cover it with sand and keep covering it, because it’s hot and we don’t want it to burn yet so if it still smolders put more on it, because now we’re Actually trying to put it out once it cools down, you have your char cloth, so that’s how you can actually make it in the wild, with just your t-shirt, part of your pants, your socks or underwear as long as it’s a hundred percent cotton.
So I hope you enjoyed this article come and see us more. This was sponsored by survival warehouse com as part of the survival warehouse library, I’m John malandra and i’ll see on the next article. You you
Article here today is out on a little bit of a trick me and my pooch, and just out enjoying enjoying nature a little bit thought I’d shoot this article here of how to start a fire, I’m going to use a Ferro rod, but I’m going to do This article, I know, there’s a gazillion articles out there on how to start fires – and I mean everybody – that’s about making articles on bushcraft and survival on the stuff shows you how to make fire.
So I’m not trying to harp on something. That’s old, but it’s very important, but I wanted to show you something that places to look for some dry tinder. If it’s wet here in northern Idaho, it’s been raining while it snowed for a while and then it rained and then it snowed and we’ve got a little bit of snow this morning. So things are pretty well soaked. I mean i’ll show you here in a minute how health soap things really are, but i’m going to show you a place to get some dry tinder and that i’m going to drop my bags here and my gun and after I do that I’ll I’ll show you Warmer to find some dry tinder, at least here here in the north northwest, you know a lot of pine trees and such back east.
You know you can find the same stuff. I just might be a little harder to find, but you can do the same thing. So show you here, quick, sorry about shaken but show you here. Hopefully you can see it. I don’t know I can and see there on that tree all the water. On those I mean there, you can see it just fell off, so you can tell how wet you know how wet it is right now. So all right! Well, I’m going to drop my stuff here and we’ll be right back with you, alright guys.
So I already got my my fine twigs and that all gathered up. I didn’t want to bore you with that. There’s a lot of good information out there on how to do that and I’ll show you a little bit how I do it, but there’s like I said, there’s a lot of good information out there from you know all kinds of guys. You know Dave Canterbury, Jamie burly, Sarge, farrier, sorry Sarge. If I butchered their name – um snow Walker, critter, you know, there’s there’s a bunch of good guys, and I know those guys are all kind of related in one way or another, but they do have a lot of good information.
But so I’m not going to bore you with. You know that that type of information on gathering the twigs and stuff, but what I am going to do is show you some really good things that you can use here to get your fire going, especially as what is it is, and without any char fire cubes Or anything like that, so I’m going to turn around here and try and get this camera set up here for you. But this is what you’re looking for these trees that have woodpecker holes in them, those real old trees.
I mean that one’s broke off at the top, but in those holes, fellas is very dry tinder and I’m going to get this set up and now uh I’ll get right back with you, okay. So this is what you’re, after this stuff right here all them finds. Here’s some real nice stuff right there and again you want to keep in mind which side of the tree this is on, and you know where the Sun is going to hit the tree and kind of where the best best side of tree to get this stuff.
As from is but I’m going to get things set up here, get this camera back here and gets it in here, so you can kind of see how I do this sorry about this. I got a fasten, the camera to my pod here. So, okay, there we go now. What I do is I like to take a piece of bark or something like that and take it here’s another good spot. You just might have seen a bunch of this stuff fall. All the bugs have chewed a lot of real fine material in there and that stuff is dry.
I mean that stuff is bone, dry um, but what I’ll do is I’ll take a see if I can get a little piece of a better piece of mark here but I’ll take. You now take my knife and I’ll get in these holes places like here I mean that you can see how soft that is. I can just take that and stick my knife right in there. That’s the stuff! You want to get that stuff right there I’ll pull that off man, that’s good good stuff, right there, real good stuff! You can’t ask for much better than that.
I like to get a lot of the fine stuff too, not just that of course or stuff. So I’ll take this stuff with the fine shavings and I’ll gather gather a lot of this stuff up. You can see they’re all that good rotten material, and you can also make char you can make charter out of this stuff. So you know, if you don’t have char or something you can make your char out of this like punk, wood or whatever.
You want to call it the woodpecker holes and this real chewed up rotten wood here, that’s really dry, but I get try and get a whole try and get a whole pile of this stuff and I’ll. I got that that’s probably about what i’ll use and i’ll show you something else here, i’m going to head over through to my my site and i’ll show you where I, where i’m going to set up my camp and i’ll, show you something else that works very Well too, I guess I could show you one thing here, while i’m here, if it’s dry, if you can see it back here hanging, I try and zoom in for you now.
You don’t have necessarily have this back East, but right in there there’s a old man’s beard or likin that stuff, if that’s dry, that makes really good fire tender, to least in the in the West here. So I’m going to head over to the camp and moola I’ll show you another really really good thing. I found that works really good for getting your fire started. So I’ll, be right back with you, okay, guys, so right, right! Here’s where i’m going to set up my fire lane have my fire and everything, but this is what I wanted to show you these dead, pine nettles right here these are dead.
Obviously you can see the difference between these and these. These I just take these and I strip these right off the limbs and those there are incredible, I mean just incredible and they can be damp, wet verbally, not soaking, wet, but they’ll work, i’ll, gather up a big old handful of them and i’ll show you what I do with them here in a here in a moment, but those things right there, those dead, pine, nettles work, awesome, really really really good.
So I’ll be right back with you soon as I get off get these gathered up all right. So hopefully you can see all this. What I, what I like to do first, is find me a piece of bark, a nice piece of bark like this one and I’ll take and hopefully and see this I’ll put my pine nettles on the base right there like that, and then what I’ll do? After that is I’ll, take my my whatever might rotten wood or my stuff.
We got out of the woodpecker holes and I’ll put that down, follow that down on there and what that will do if you catch that stuff on fire, if you catch that on fire there, that will hold a number a really long time. I mean that that will hold a really really long time so show you here. I’ve put my pieces on top. I hope you can see that okay on top of my pine nettles, so what I’m going to do is I’ll take and I’ll just take my Ferro rod and I’ll.
Just take that and I was taking okay right there. We got it, smoldering already come up here and sure yeah try not about this camera around, but there you can see how that stuff works. Just smolder and i’ll just keep catching other parts of that on. I just breathe in a blow on that, and I take my fine, my fine twigs, my real fine, fine twigs. You always want to start with real fine twigs, always start with your your fire lays and stuff with fine fine twigs, that’s what you want to catch and then just blow it to life, and it might take a little bit longer with this type of stuff versus You know like char cloth or something but and like I said these twigs are really really wet so going to take a little bit to try them out long, steady blows now we’ll take you set this whole thing down, read out pup a gent ramble and we’ll Start putting some more stuff laying it right on on top there now this stuff is all wet, so it’s got to dry out.
It’s going to really smoke on you, I’m being it’s really wet. You might have to. You know cater to it a little bit more than normal. You put 10 on my wood buddy, I just throw it throw it on there and I, like Dave, said fire likes chaos. So there you go so I’ve better check this camera. This thing shuts off on me in 10 minutes, so I better make sure where we’re at, but so I hopefully you you’ve got something out of this um, like I said, I’m not trying to repeat – or you know, beat a dead horse, but you know I mean It this things work differently all across the world, all across the u.
S.. You know all over the place things work different, so this is just something that works real good for me here you know Ferro rod, not! I didn’t have no char, no, nothing like that and you can see, hopefully so good how how this all worked and how everything went, but uh I’m going to take time here to relax a little bit. Oh my apologize. I haven’t had much time to make articles nut, but just been really busy and i’m going to have some spruce, nettle, tea and just kind of kick back and relax.
Oh, maybe I’ll jump back on here a little bit later. I don’t know, but if not till next time take care, guys god bless and we’ll see on the next one have a good one, alright guys so we’ve got a good old fire going there that our nettle tea going and thought i’d show you something here, quick, Maybe a little tip or trick that maybe you can use or whatever but show you here bottom my haversack, the haversack I made out of a some brain tanned elk, hide that I had brain tanned, a while back.
My name is here on the bottom this here I keep my my flannel in there. I keep some other small stuff of my reusable space blanket in there. I have my squirrel roaster in there, but on the outside here the piece of neoprene off of a pair of old chest waders. I cut a section out of that and that works really nice too. If you’re coming out in the woods and this grounds wet I’ll. Take that and put that down, you can sit on it and keep your butt dry and just a little you know, don’t weigh nothing.
You know so I just thought I’d show you that they’re, quick and maybe somebody can add that to their pack. So alright guys we’ll take care. God bless you
So sit back grab some grog and let’s have our pirate conversation. Well, matey’s, the moment we’ve all been waiting for is finally here fire. Now the question is: in what ways can we use fire for our advantage on the seas? Now before I show you all the different ways you can use it.
The first question is: where do you find them? Well, the simple answer: is you can’t have them? I have taken them all and I plan on using them. I mean you, you can find them around the world of the sea of thieves, just like the curse cannonballs. So make sure to always look in those barrels and collect these beautiful, beautiful fire bombs. Now, let’s jump into some of the ways that you can use them and how fireworks in the seas that’s right, mates everything can come ablaze, pirates, ships and skeletons can all be set on fire.
But how does this fire start? You ask well, fortunately, for all of you: fires can start in a lot of different ways: explosions from kegs, lightning, I that is right, lightning, can start fires on your ship and catch you on fire as well. It’s also still pretty dangerous to get hit by those lightning strikes, so make sure you always have something help, heal and, of course, fire bombs can catch you on fire and if you dare to venture into the devil’s roar the volcano’s going to really make your ship Shine and not in a good way, even the Seas themselves can catch on fire.
I mean I, okay, not everything catches on fire, but you understand what I’m trying to say. We now have throwable fire bombs at our disposal, which means. Oh you, fire happy pyromaniacs. You are going to have an awesome time with these, probably the simplest and the best way to use these new fire bombs is to just simply throw them. You can equip these new fire bombs through the radio dial and use them against your enemies, ships, and so so much more.
You can even throw them at your teammate who isn’t helping at all on the ship and just plain music, while you’re doing all the work. So, for all you pirates out there that don’t help there’s now a way to well light a fire underneath you, if you get what I’m trying to say, another fine use for these little beauties are loading them into cannons and shooting them at your unsuspecting enemies. The same bomb that you throw is the same bomb that you load into the cannon.
Needless to say, there are a lot of uses for them, so if you’re coming up on an enemy ship – and you want to give them something to worry about well make sure to load these fire bombs into your cannon and they won’t know what to do with It what makes these fire bombs, especially good against ships, is it can catch the whole ship on fire, including the masts, so it really adds a new element of combat to the seas that you need to be aware of hi.
That is right. Matey. Sometimes you need a quick snack on the go while you’re running around the island. Well, all you have to do now is throw one of these at a snake, a pig or even Larry the chicken, and they will drop either a cooked or burn meat for you to eat. This even works for those unfortunate animals that may be caught in the cage either way. Just remember, you need a quick snack use, a fire bomb.
Sometimes after a long day of Steven, you just want to make a campfire and swap stories of all your adventures. Well, now you can light a campfire very easily. Building one is no problem. All you need is a bit of wood and you are good to go. However, something you may want to keep in mind is that these new campfires, let up smoke into the sky, letting other pirates know exactly where you are, and this smoke can be seen from quite the distance, so light these up at your own risk or, if you’re, A crafty pirate to sorts – you could always use this to your advantage as a decoy, either way something to keep in mind all this fire talk reminds me, though, for all you pirates out there that may not know the best way to put a fire out is To use water, our ships are now equipped with new water barrels that you can use to get water.
So just in case your ship is on fire. Maybe you cook something a little too long and it caught your ship on fire, or maybe just maybe you accidentally throw a fire bomb at your mate and now you need to put a fire out. Well, this water barrel can save your life. Another thing to take note of is, if you find yourself accidentally catching yourself on fire, or maybe another pirate decides to use a fire bomb against you.
Well, you can take a bucket of water and douse yourself with it. So a protip here it is now going to be super beneficial to always have water in your bucket. So whenever you get a chance, make sure to fill that bucket up with water, it could save your life well mates. That is all I have for you. I hope all of you pyromaniacs enjoy this new mechanic in our seas, because I know I sure, will and make sure to.
Let me know in the comments below what way you plan to use fire first. Until then mates, I hope to see you out on the seas.
If you don’t have the space to build a larger bonfire. Making your own burn barrel is as simple as finding a 55 gallon 208 point: 2l metal drum, removing the lid or opening one end and punching holes near the bottom to provide ventilation, be sure to only use your burn barrel on your own property to eliminate materials That can be burned safely, like tree limbs, brush and other natural debris.
Fashioning the barrel acquire a 55 gallon 208 point: 2l steel drum. You can often purchase these for a small price from manufacturing plants, scrap yards and recycling facilities. In some cases, you might even be able to find them lying around for free if you’re unable to track down a suitable drum. You also have the option of buying one online. However, they will be a little more expensive. You can expect to pay as much as $ 80 120 for a brand new steel drum.
It’s important that the drum you use be made from thick heat resistant steel. Other materials won’t be able to withstand intense burning temperatures and may produce toxic chemical fumes as they melt. If you’re unable to track down a suitable drum. You also have the option of buying one online. However, they will be a little more expensive. You can expect to pay as much as $ 80 120 for a brand new steel drum.
It’s important that the drum you use be made from thick heat resistant steel. Other materials won’t be able to withstand intense burning temperatures and may produce toxic chemical fumes as they melt open one end of the drum. If your barrel has a removable cover, all you have to do is pull it off. If the drum is tight, meaning both ends are sealed. However, it will be necessary to cut off one of the ends to do this.
Use a reciprocating saw jigsaw to cut slowly around the raised lip at the top of the barrel until the circular face comes away. In one piece, we’re thick work gloves to protect your hands while operating the saw, if possible, pull on a pair of earmuffs as well. It’s going to get loud. You can also use a barrel opener tool to pry open, tight drums. These basically work, like giant, can openers clamp the head of the tool over the edge of the drum then push down forcefully on the handle to slice into the metal surface, repositioning the tool every three to four inches 7.
6. To ten point, two centimeters we’re thick work gloves to protect your hands while operating the saw, if possible, pull on a pair of ear muffs as well. It’s going to get loud. You can also use a barrel opener tool to pry open tight drums. These basically work, like giant, can openers clamp the head of the tool over the edge of the drum then push down forcefully on the handle to slice into the metal surface, repositioning the tool every three to four inches 7.
6 to ten point: two centimeters create 3 to 4 1/2 inch 1.3 centimeters drainage holes in the bottom of the drum flip, the drum over and use an electric drill or hammer and chisel to open up a few evenly spaced holes near the center of the bottom surface. These holes will let out any water. The barrel happens to collect during a heavy downpour. If the drainage holes are smaller than 1/2 inch, 1.3 centimeters in diameter standing water may not be able to escape and a fast enough rate which can make burning difficult or impossible.
If the drainage holes are smaller than 2 inch, 1.3 centimeters in diameter standing water may not be able to escape at a fast enough rate, which can make burning difficult or impossible drill or punched 12 to 15 1/2 inch 1.3 centimeters holes in the sides of the Drum once you’ve put some holes in the bottom of the drum do the same for the sides along the lower half. You can pretty much make these holes at random, but keep them roughly the same distance apart.
The holes in the lower part of the drum will act as ventilation flus to supply the fire with oxygen and keep it burning hotter longer avoid making too many holes or it could weaken. The structure of the drum any more than 20 to 25 is excessive. The holes in the lower part of the drum will act as ventilation flus to supply the fire with oxygen and keep it burning hotter longer avoid making too many holes or it could weaken.
The structure of the drum any more than 20 to 25 is excessive. Find a piece of metal grating to use as a screen a sheet of expanded metal will work. Well, as will a section of chain-link, fencing or flexible hardware cloth, make sure your screen is large enough to cover the entire opening of the drum and will help keep sparks and cinders from escaping, while burning there shouldn’t be any need to modify the screen.
As you can simply slide the whole sheet into place over the drum, if you like, however, you can use your jigsaw or a pair of wire cutters to trim the screen to the same shape as the opening. If you decide to cut your grating, make sure it’s two to three inches five point, one to seven point six centimeters wider than the drum opening, so it will be able to rest on top easily. There shouldn’t be any need to modify the screen, as you can simply slide the whole sheet into place over the drum.
If you like, however, you can use your jigsaw or a pair of wire cutters to trim the screen to the same shape as the opening. If you decide to cut your grating, make sure it’s two to three inches five point, one to seven point six centimeters wider than the drum opening, so it will be able to rest on top easily situate the drum at least 30 feet 9.1 meters away from surrounding Objects, keeping your burn barrel at a safe distance from trees and thick brush, as well as structures like garages, sheds and wooden decks and porches will help minimize the risk of accidental fires.
Additionally make sure there are no flammable items within 10 feet. 3.0 meters of the barrel, while it’s in use place your burn barrel on four concrete blocks, lay the blocks out on the ground in a square shape, then hoist the barrel up onto the blocks so that its outer edges sit at the center of each block. Elevating the barrel will allow air to pass underneath drawing more oxygen into the flues you drilled earlier.
It’s important that you use four blocks rather than two in order to prevent the barrel from accidentally tipping over. It’s important that you use four blocks rather than two in order to prevent the barrel from accidentally tipping over
Our goal is to make its a full time RV, but in the meantime, we’ll have to continue building our life. This time older and wiser hi and welcome back pretty excited today, we’ve got the solo. Stove here came a meal yesterday we didn’t get a chance to try it out, but we’re going to do that today got it all packaged up in its bag.
In that and the nice carrying case that it came with the model we have is the bonfire, which is the mid-size. They have a. They have a slightly larger version that is um available for pre-order right now, and then they have the smaller Ranger, which is about 5 pounds lighter and all a little shorter and a little less circumference. But this kind of seemed to be the one everybody liked because it fits the standard cut of wood better where the Ranger might might not.
So much, and one of the main reasons that I liked the idea of this sollozzo was that it’s supposed to be very easy to start a fire not sitting there intending to the fire or building the perfect fire. I don’t I don’t understand why. But for some reason that’s just not a skill I ever really acquired, but it’s all those stones supposed to solve that. So, like I said we haven’t used it. Yet I’m going to go ahead and build it start the fire and see what happens see if it’s really as easy to use as they say, and there we go.
We’ve got our case over here. I can sit that out of the way the Stan sits inside real nice and the upper ring as well all fits inside. So it’s nice and campaign, and there is a little groove in there that it fits into so now it’s pretty stable, the the upper ring. Maybe they leave you a note to make sure that you don’t put it in this way, because this will cover the holes around the upper top of the stove, and that is apparently important in the function.
This thing will go on after we put wood and stuff in there and to make this a little more of an authentic test and they use stuff that I would find around my typical campsite, which means stuff like napkins paper bag, baby paper bag, some old stuff. We found in the truck – I also have a few sticks that I found around the yard, so these should work I’m going to go ahead and put this firewood in and light it up and we’ll see if it works or not.
I’ve got my handy-dandy lighter here. I’r going to go ahead and set everything on fire and we’ll see if this thing is as easy as they say to get a fire going and keep it going. Because, if I can do it like this, then anybody can do it and, of course, we’ll go ahead and put the ring on well. I think we have a fire. I did have to go in and and relight the center one time, but I didn’t add anything to it.
Didn’t shift anything around from the real wonky way that I put things in, we don’t have the smell. The smoke is coming straight up now, which is good. I should probably add another log or two to it at some point. I said not the best of the building of the fires, but this is going pretty good and I think about 10 minutes from the time I lit it. To where we are right now is. Is what we’ve got and that’s that’s a record for me.
I put five pieces in initially. Oh I’ve got six and seven here so up there within a little cattywampus just because I think that it needs a little bit more fuel to keep it going longer. We’re going to roast some marshmallows hot dogs things like that later, so you want to keep it going, but it looks okay. Now it looks like it’s, it could keep going for a while. I think that even I couldn’t mess this up.
It would seem that, after having just two more pieces of wood, I now have this raging inferno. This is pretty great. I am starting to see fire coming out of the little a lot of the little rings they’re here in the back. Maybe you can see it’s coming up out of the out of the stove out of the the bonfire here pretty good. This is a significant fire and I’m actually feeling quite a bit of heat. This close to it so we’re about 20 to 25 minutes into this thing, and I haven’t had to do much.
We’ve got a really good fire going here. I did add those two pieces and I did have to kind of relight the center of the kindling that I put in there, but other than that I’ve just been sitting around doing nothing. This is pretty impressive. I don’t think that I’ve ever built a fire this. This nice, this is strong. This is going good, it’s hot, like standing right here, I am uncomfortable. I could take a few steps back.
This is going to save us a lot of time normally when, when we go to build a campfire I’ll mess around with it for about 20 minutes, I may or may not get a weak fire out of it, and then I usually end up saying: hey T: Go fix the fire, the bonfire model does have a nice portability to it. I wish it were a little smaller and I wish that they had included some kind of indentations or grips on the outside of the stove itself, as it is the only real easy way to carry it around is inside the included carrying case.
It doesn’t take up a ton of room in the back of our truck and we do have a short bed and we have RAM boxes. So our truck bed space is already at a premium, but I don’t think it’s going to keep us from taking all the things that we would normally take when we go camping. One of the biggest things we noticed was that there was no campfire smell lingering on our clothing. After we came back inside, it seems the solo stove held up to its promise of keeping the smoke out of everyone’s faces.
We did have a fairly windy evening, but nobody complained about getting smoked. Nobody had to move their chairs, it was really nice. The next morning I checked on the stove and cleanup was very easy. There was just a little bit of ash in there pick it up. Dump it out nothing much to contend with. There were no scorch marks on the patio, and at no time did, I feel that anything around the Solow stove, at least at the ground level, was in any danger of getting too much heat or igniting success.
Absolutely I was skeptical me too. You did good. This is a good buy yeah. That means I get to buy more things, so I think we’re going to wrap it up for now, we’ve got a raging fire going. This thing is great: we’ve got some hot dogs waiting inside to be roasted along with some marshmallows, my favorite part yeah. Yes, it is your favorite. Yes, you do so. This is a success. This is the solo. Stove bonfires super easy to start yeah, big winner, right, yeah, okay, so what I’ll put links below to everything? Yes, okay, show up the links below to everything.
If you liked the article, if you thought it was useful click the like button subscribe article. Yes, we appreciate all our subscribers and, if you click the bell, you’ll get notifications when we upload new articles, yeah we’ll see you next time bye. That’s your cue. Miss the big bye, bye,


 When camping in the rainfalls, opportunities you are will certainly be investing a great deal of time inside. Buying a large-sized outdoor tents will certainly assist you as well as your camping buddies remain sane much longer.